Table of Contents
Introduction
Most Common Blower Fan Problems
Diagnosing Noise and Vibration Issues
Troubleshooting Reduced Airflow
Motor Overheating and Electrical Failures
Bearing Failure: Causes and Prevention
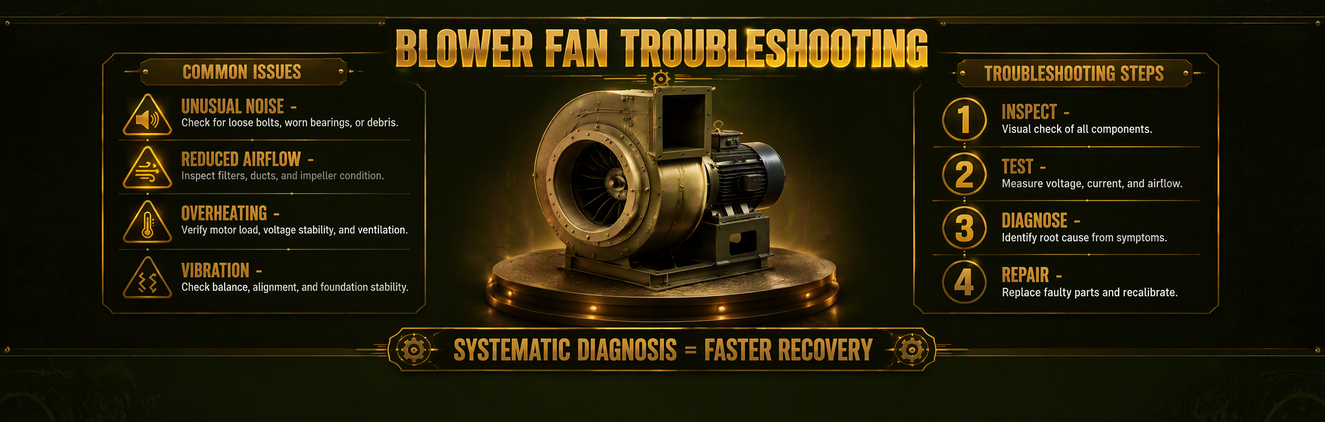
Systematic Troubleshooting Workflow
Preventive Maintenance Best Practices
Summary
Frequently Asked Questions
References
1.Introduction
Blower fans are critical components in HVAC systems, server cooling, industrial exhaust, and cleanroom ventilation. When a blower fan fails or underperforms, the consequences range from uncomfortable temperatures to equipment damage and production downtime. AMCA International reports that fan-related problems account for a significant portion of HVAC service calls, with many traceable to a handful of root causes that are diagnosable without specialized equipment [4].
This guide covers the most common blower fan problems, how to diagnose them step by step, and what to do about them. Whether you are a facility maintenance technician, an HVAC contractor, or an engineer designing cooling systems, the troubleshooting methods described here will help you identify problems quickly and avoid unnecessary part replacements [1].
2.Most Common Blower Fan Problems

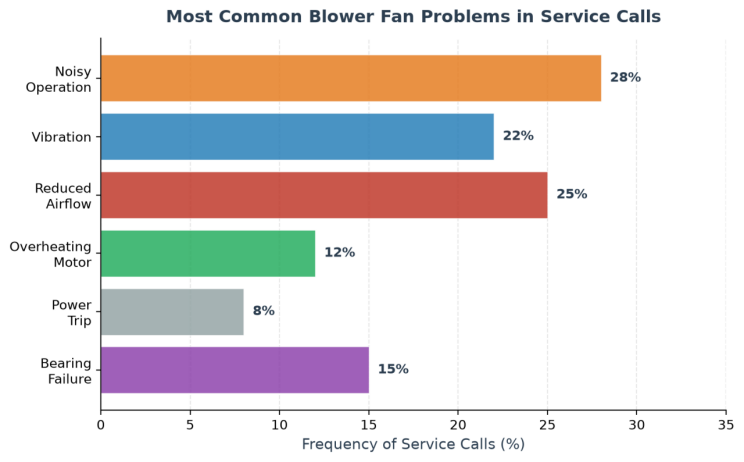
Figure 1: Frequency of common blower fan problems reported in service calls. Noise, reduced airflow, and vibration together account for over 70% of all service requests.
Based on service call data from manufacturers and maintenance contractors, six problem categories cover the vast majority of blower fan issues [2]. Understanding which category your symptom falls into is the first step toward an effective repair.
The big six problems:
Noisy operation — Grinding, squealing, rattling, or humming sounds from the blower housing
Vibration — Excessive shaking of the blower assembly, ductwork, or mounting frame
Reduced airflow — Lower than expected air delivery at the supply or exhaust registers
Motor overheating — Motor housing too hot to touch, thermal overload tripping repeatedly
Power trip — Circuit breaker or fuse blowing when the blower starts or runs
Bearing failure — Rough rotation, shaft play, or seized impeller when turned by hand
Sanyo Denki service data indicates that noise and vibration complaints together represent nearly half of all blower fan service requests, followed by reduced airflow at about 25% [2]. The remaining issues, while less frequent, tend to be more serious and often require component replacement rather than adjustment.
3. Diagnosing Noise and Vibration Issues

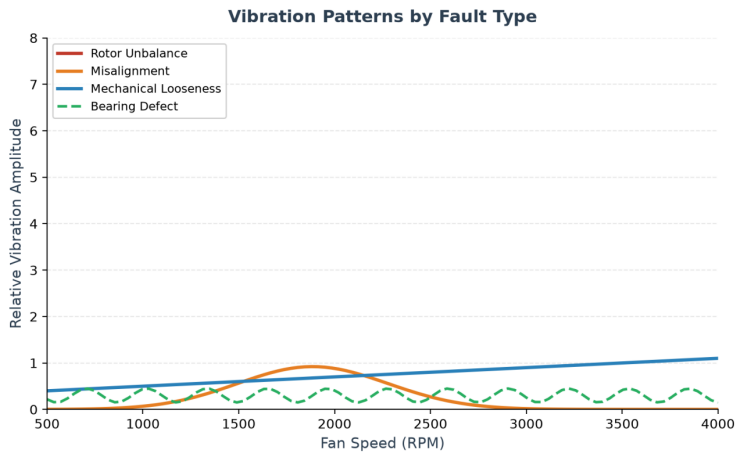
Figure 2: Vibration amplitude patterns by fault type. Rotor unbalance increases with speed, misalignment peaks at a specific frequency, looseness is broadband, and bearing defects produce characteristic high-frequency signatures.
Noise and vibration are the most common blower fan complaints, and they usually share the same root cause. The key is to identify what type of noise you are hearing and when it occurs in the operating cycle [1].
Squealing or screeching noise:
This almost always points to a bearing problem. The sound occurs when lubrication has broken down or the bearing races are pitted. If the squeal disappears after a few minutes of operation, the bearing is likely marginal and will fail soon. Replace it before it seizes and damages the shaft [1].
Rattling or banging noise:
Loose mounting bolts, a cracked impeller, or foreign debris inside the blower housing are the usual suspects. Shut down the blower and inspect the housing interior. Even small objects like screws or insulation fragments can create significant noise and eventually damage the impeller blades [4].
Humming noise with slow or no rotation:
This indicates an electrical problem, typically a failed start capacitor or a stuck centrifugal switch. The motor is trying to start but cannot develop enough torque to overcome inertia. Continuing to run in this state will trip the thermal overload or burn out the motor winding [3].
Vibration diagnosis:
Vibration patterns reveal specific faults. Rotor unbalance produces vibration that increases with speed and is strongest in the radial direction. Misalignment between the motor shaft and blower wheel produces peak vibration at a specific frequency, usually at 1x or 2x the running speed. Mechanical looseness creates broadband vibration across many frequencies [1]. If you have access to a vibration analyzer, compare the frequency spectrum against the patterns shown in Figure 2. Without one, a simple mechanic's stethoscope can help localize the vibration source.
ebm-papst recommends checking the dynamic balance of the impeller whenever vibration levels exceed ISO 10816 vibration severity limits for the fan frame size [1]. Rebalancing or impeller replacement is often more cost-effective than allowing excessive vibration to destroy bearings and shorten motor life.
4. Troubleshooting Reduced Airflow

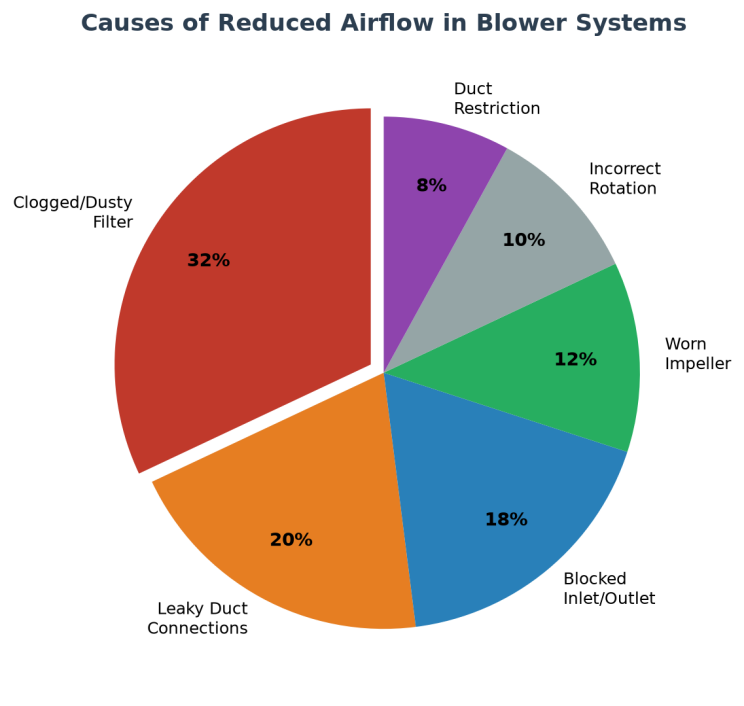
Figure 3: Causes of reduced airflow in blower systems. Clogged filters and leaky ducts together account for over half of all underperformance cases.
When airflow at the registers is lower than design specifications, the blower fan is often blamed when the actual culprit is somewhere else in the system. AMCA Standard 210 defines the testing procedures for fan performance, and following a systematic elimination process will save hours of misdiagnosis [4].
Step 1: Check the filter.
A clogged filter is the single most common cause of reduced airflow. If the filter looks dirty, replace it and re-measure airflow. In commercial systems with multiple filters, check all of them. A partially blocked filter can reduce airflow by 30% or more without any obvious visual indication [4].
Step 2: Inspect duct connections.
Leaky duct joints, disconnected flex duct, or unsealed connections can lose 15 to 30% of the delivered airflow before it reaches the intended space. Visually inspect all accessible ductwork and use a smoke pencil or anemometer at suspect joints to detect leaks [5].
Step 3: Verify impeller condition and rotation.
A worn or eroded impeller cannot generate the designed pressure. Inspect the blades for wear, pitting, or accumulated material. Also verify rotation direction. Three-phase motors can run backward if two leads are swapped during installation, and a reversed impeller delivers only 20 to 30% of rated airflow while sounding normal [1].
Step 4: Check for system restrictions.
Closed dampers, blocked registers, collapsed duct sections, or accumulated debris in the ductwork all restrict airflow. Measure static pressure across the blower and compare it to the design value. If static pressure is higher than expected, the system has excess resistance somewhere downstream [4].
ASHRAE guidelines recommend measuring total external static pressure as a routine troubleshooting step. If the measured pressure differs from the design pressure by more than 15%, the system has a problem that needs investigation [5].
5. Motor Overheating and Electrical Failures
Blower fan motors are designed to operate at temperatures that feel hot to the touch, typically 60 to 80 degrees Celsius on the housing surface. However, if the motor is hot enough to burn your hand or if the thermal overload trips repeatedly, there is a problem that needs attention [3].
Common causes of motor overheating:
Dirty or clogged impeller — Adds load on the motor, increasing current draw and heat
Restricted airflow — The motor relies on airflow across its housing for cooling
Wrong capacitor rating — A weak or incorrect capacitor causes high running current
Voltage imbalance — On three-phase systems, even 2% voltage imbalance can cause overheating
Worn bearings — Friction from failing bearings generates heat that transfers to the motor
The IEEE has published guidelines on motor protection that recommend measuring running amperage against the nameplate full-load amps (FLA) rating. If measured current exceeds FLA by more than 10% with the blower running at normal speed, the motor is overloaded and will fail prematurely [3].
For circuit breaker tripping problems, check the start capacitor first. A weak capacitor causes high inrush current that can trip breakers even though the motor runs fine once started. Use a capacitance meter to verify the capacitor value is within 10% of its rated capacity. If the capacitor tests fine, check for a shorted motor winding using an insulation resistance tester (megohmmeter) [3].
The U.S. Department of Energy notes that motor failures caused by electrical issues are often preventable through regular thermal imaging and current analysis, which can detect developing faults weeks or months before catastrophic failure [6].
6. Bearing Failure: Causes and Prevention

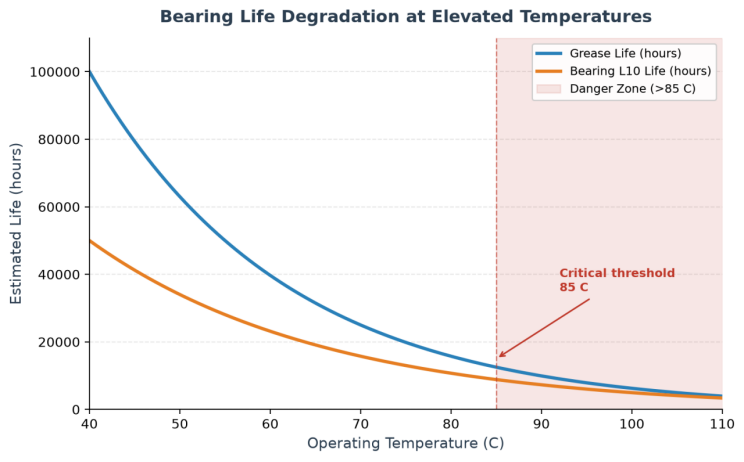
Figure 4: Bearing life degradation at elevated operating temperatures. Grease life and L10 bearing life both drop sharply above 85 degrees Celsius, halving approximately every 15 to 18 degrees of additional temperature rise.
Bearing failure is the most common mechanical failure mode in blower fans. Sunon publishes L10 bearing life data showing that properly maintained bearings can last 40,000 to 60,000 hours, but this drops dramatically when operating conditions are poor [7].
Factors that shorten bearing life:
High operating temperature — Every 15 degrees above 40C roughly halves grease life
Contamination — Dust, moisture, or corrosive fumes entering the bearing
Over-lubrication — Too much grease causes churning and heat buildup
Misalignment — Shaft misalignment puts uneven load on the bearing races
Vibration — Even small vibrations transmitted to stationary bearings cause brinelling
The relationship between temperature and bearing life is critical. At 40 degrees Celsius, a quality ball bearing might have an L10 life of 50,000 hours. At 85 degrees, that drops to about 12,000 hours. At 100 degrees, you are looking at 4,000 hours or less [7]. If your blower motor housing consistently runs above 85 degrees, you need to address the root cause of the heat, not just replace bearings more often.
ebm-papst recommends using sealed-for-life bearings in applications where contamination is a concern, and magnetic levitation bearings in extreme-duty or high-speed applications where conventional bearings fail prematurely [1].
7. Systematic Troubleshooting Workflow

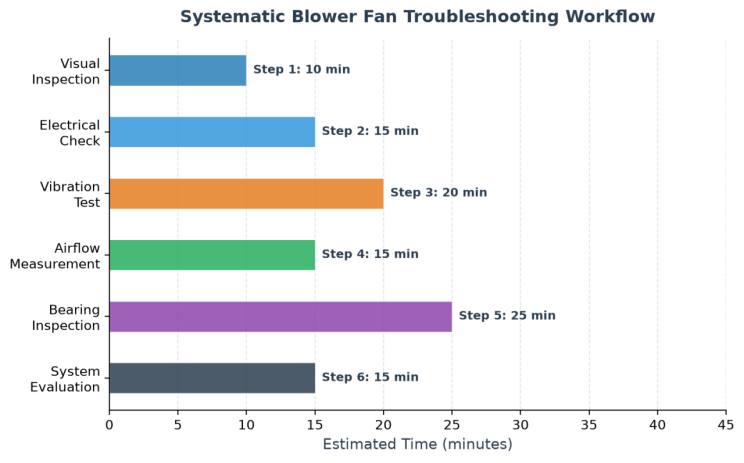
Figure 5: A six-step troubleshooting workflow that takes about 90 minutes for a single blower unit. Following this sequence avoids the common trap of replacing parts before identifying the root cause.
When a blower fan problem is reported, resist the temptation to start disassembling things. A structured approach will save time and prevent misdiagnosis. Here is a six-step workflow developed from manufacturer service guidelines and field experience [1] [4].
Step 1: Visual Inspection (10 minutes)
Look for obvious problems first. Check the filter, inspect the impeller for visible damage or debris, examine duct connections for gaps, and look at the motor mounting for loose bolts. Many problems are visible if you take the time to look before reaching for tools [4].
Step 2: Electrical Check (15 minutes)
Verify supply voltage at the motor terminals with the blower running. Check for voltage imbalance on three-phase systems. Measure running amperage and compare to the nameplate FLA. Test the start and run capacitors with a capacitance meter [3].
Step 3: Vibration Test (20 minutes)
If noise or vibration is the complaint, run the blower and feel the housing and mounting frame. If you have a vibration meter, measure at the bearing housings in the horizontal, vertical, and axial directions. Compare readings against ISO 10816 limits [1].
Step 4: Airflow Measurement (15 minutes)
Measure airflow at the supply or exhaust register using an anemometer or flow hood. Compare to design specifications. If airflow is low, measure static pressure across the blower to determine if the problem is the fan or the system [4].
Step 5: Bearing Inspection (25 minutes)
With the power locked out, rotate the impeller by hand. Feel for roughness, grinding, or excessive play. If the bearing feels rough or the shaft has more than 0.05 mm of radial play, the bearing needs replacement [7].
Step 6: System Evaluation (15 minutes)
After identifying and addressing the specific fault, evaluate the overall system. Was the problem caused by a systemic issue like poor filtration, high operating temperature, or undersized ductwork? Fixing the root cause prevents recurrence [5].
8. Preventive Maintenance Best Practices
Most blower fan failures are preventable with a simple maintenance schedule. ASHRAE guidelines for HVAC maintenance recommend the following routine tasks [5].
Monthly:
Inspect and replace filters as needed
Listen for unusual noises during normal operation
Check that all registers and dampers are in the correct position
Quarterly:
Measure motor running amperage and compare to nameplate FLA [3]
Inspect belt tension and condition on belt-driven blowers
Check for air leaks at duct connections and seal as needed
Clean impeller blades if visible dirt accumulation is present [4]
Annually:
Lubricate bearings per manufacturer specifications (if not sealed) [7]
Measure vibration levels and trend over time [1]
Inspect electrical connections for corrosion or looseness [3]
Verify system static pressure against design values [5]
Check motor winding insulation resistance with a megohmmeter [3]
Energy Star recommends keeping a maintenance log for each blower unit, recording measurements at each inspection interval. Trending amperage, vibration, and temperature data over time allows you to spot degradation before it becomes a failure [8].
The DOE has documented that facilities with systematic preventive maintenance programs experience 40 to 60% fewer unplanned motor failures compared to those using reactive maintenance only [6]. The cost savings from avoided downtime alone typically justify the maintenance labor cost many times over.
9. Summary
Blower fan troubleshooting does not require specialized equipment in most cases. The majority of problems fall into six categories: noise, vibration, reduced airflow, motor overheating, power trips, and bearing failure. By following a systematic six-step workflow, you can identify the root cause in about 90 minutes without replacing parts unnecessarily.
The most common mistakes are blaming the blower for system-level problems like clogged filters and leaky ducts, and replacing bearings without addressing the conditions that caused them to fail. Temperature is the single biggest factor in bearing life, and every 15 degrees above 40 degrees Celsius cuts grease life in half. A structured preventive maintenance program, including monthly filter checks, quarterly amperage measurement, and annual vibration trending, can prevent most blower fan failures before they happen.
10. Frequently Asked Questions
Q1: My blower fan is making a squealing noise. What should I check first?
Start with the bearings. A squealing or screeching sound almost always indicates a lubrication breakdown or bearing race damage. Shut off power, rotate the impeller by hand, and feel for roughness or grinding. If the bearing feels rough, replace it. If the squeal only occurs at startup and fades after a few minutes, the bearing is marginal and will fail soon, so schedule replacement before it seizes [1].
Q2: The blower is running but airflow at the registers is weak. Is the fan broken?
Not necessarily. In most cases, the blower fan is fine and the problem is elsewhere in the system. Check the filter first, as clogged filters cause 30% or more of reduced airflow complaints. Then inspect duct connections for leaks and verify that dampers are open. Only after ruling out these system-level issues should you inspect the impeller and measure static pressure across the blower [4].
Q3: How hot is too hot for a blower fan motor?
Motor housings normally run at 60 to 80 degrees Celsius, which feels very hot to the touch but is within design limits. If the housing is hot enough to burn your skin instantly (above 90 degrees) or if the thermal overload trips repeatedly, the motor is overheating. Common causes include a dirty impeller, restricted cooling airflow, a weak capacitor, or voltage imbalance. Measure running amperage against the nameplate FLA to determine if the motor is overloaded [3].
Q4: How often should blower fan bearings be lubricated?
It depends on the bearing type and operating conditions. Sealed-for-life bearings require no lubrication and should simply be replaced when they wear out. For regreasable bearings, Sanyo Denki recommends relubrication every 6 to 12 months under normal conditions, and every 3 months in high-temperature or contaminated environments. Avoid over-greasing, which causes churning and heat buildup that actually shortens bearing life [2].
Q5: Can a blower fan run backwards on three-phase power, and how do I tell?
Yes. If two of the three phase leads are swapped during installation or repair, the motor will run in reverse. A reversed blower delivers only 20 to 30% of rated airflow while sounding normal, which makes it easy to misdiagnose as a system restriction. To check, observe the rotation direction marked on the blower housing and compare it to actual rotation. If it is backwards, swap any two of the three motor leads [1]. AMCA Standard 210 testing assumes correct rotation, so always verify this before measuring performance [4].
11. References
[1] ebm-papst Group. Blower Fan Service Manual: Troubleshooting and Maintenance Guide. Available at: https://www.ebm-papst.com.cn/en/
[2] Sanyo Denki. Sanace Blower Fan: Failure Analysis and Service Data. Available at: https://products.sanyodenki.com/en/sanace/
[3] IEEE. Rotating Machinery Insulation Testing and Motor Protection Standards. Available at: https://standards.ieee.org/
[4] AMCA International. AMCA Standard 210: Laboratory Methods of Testing Fans for Ratings and Field Troubleshooting Guide. Available at: https://amca.org/
[5] ASHRAE. HVAC System Commissioning and Maintenance Guidelines. Available at: https://www.ashrae.org/
[6] U.S. Department of Energy. Motor Systems Reliability and Predictive Maintenance Best Practices. Available at: https://www.energy.gov/eere/amo/motor-systems
[7] Sunon. DC Fan Bearing Technology: L10 Life Data and Maintenance Recommendations. Available at: https://www.sunon.com/en/
[8] Energy Star. HVAC Maintenance Guidelines for Commercial Buildings. Available at: https://www.energystar.gov/